Takealot Auto Pricing Guide: Win More Buy Box Placements Without Losing Margin
Takealot auto pricing works best when you want faster repricing without handing away margin control.
If you are still changing prices manually on important Takealot listings, you are usually paying for it in one of two ways: slower reactions or weaker margin decisions.
Most sellers have the same two concerns when they start thinking seriously about auto pricing:
- if I keep repricing manually, I am always going to react too late
- if I automate this, am I going to keep cutting price until margin disappears
Both concerns are valid. The real issue is not whether pricing should be automated. The real issue is whether you have a clear enough rule set for automation to compete inside boundaries you actually trust.
That is where Revenuealot Auto Pricing helps. It is not just a “lower my price automatically” feature. It is a workflow built around price limits, competitor scope, price recovery, and protection monitoring. Used properly, it gives you a much more controlled way to compete for the Takealot Buy Box than checking prices every few hours and reacting by instinct.
If you already know manual repricing is slowing you down, start with the Auto Pricing product page and then use this guide to set rules you can actually trust. If you want the feature walkthrough alongside this article, open the Auto Pricing docs in another tab.
Quick answer
If your goal is to improve Takealot Buy Box win rate without turning every SKU into a margin sacrifice, the strongest setup usually looks like this:
- define a realistic Min Price before anything goes live
- cap recovery with a clear Max Price
- decide whether Leadtime sellers really matter for that SKU
- enable price increase so margin can recover when pressure drops
- review ranking and Buy Box outcomes weekly instead of watching price moves in isolation
What is Takealot auto pricing and why does it matter?
Takealot auto pricing is the process of adjusting your offer price based on market conditions without manually editing the listing every time a competitor moves.
For sellers, that matters for one simple reason: Buy Box opportunities disappear quickly. If your pricing reaction is too slow, you can lose visibility even when your stock, listing quality, and fulfillment position are still strong.
Revenuealot Auto Pricing gives you a way to automate that reaction while still keeping control over the boundaries that protect margin.
Manual repricing vs automated repricing
| Approach | What usually happens | Business risk |
|---|---|---|
| Manual repricing | You notice price moves late, react inconsistently, and spend too much time checking listings | Lost Buy Box time and weak pricing discipline |
| Auto Pricing without rules | Prices change faster, but the logic can become too aggressive | Margin gets damaged if boundaries are unclear |
| Revenuealot Auto Pricing with Min/Max rules | You react faster while keeping price movement inside defined limits | Better balance between competitiveness and profit |
The key idea: Auto Pricing is not about being the cheapest forever
That is the first misconception worth clearing up.
When sellers hear “auto pricing”, many immediately assume the goal is simple:
- always be slightly cheaper than everyone else
In practice, that usually leads to weak decisions and thinner margins.
For most Takealot sellers, the real goal is closer to this:
- stay competitive when the listing is under pressure
- avoid reacting too slowly when competitors move
- recover price when the pressure eases
That is why the real value of Auto Pricing is not “be cheaper”. It is “compete with rules instead of emotion”.
For sellers who already know they want a pricing workflow instead of constant manual chasing, the next step is not more theory. It is setting a small group of live SKUs inside Revenuealot and reviewing how those rules affect Buy Box position over a week or two.
What Auto Pricing already helps you do
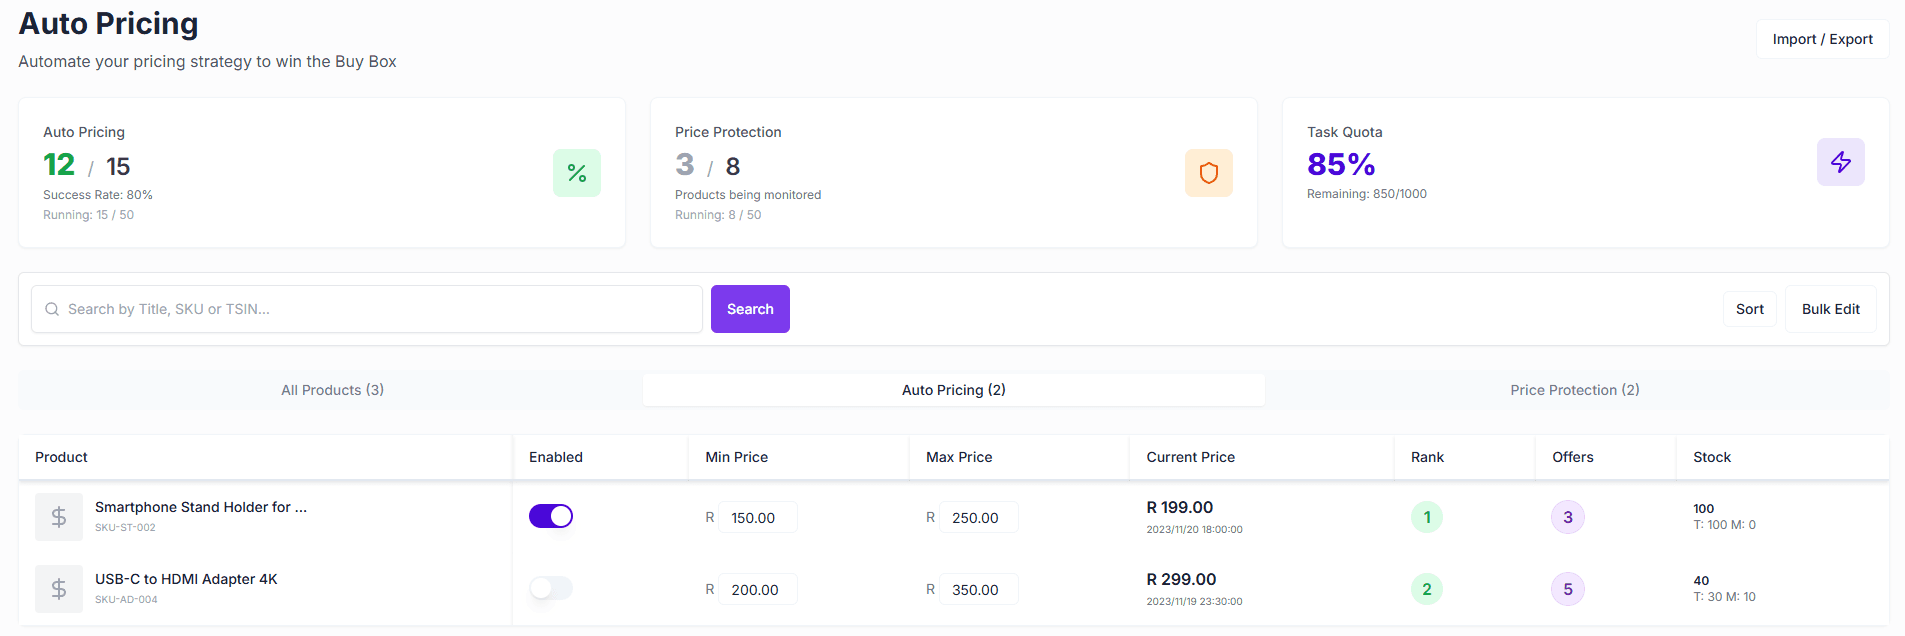
For most sellers, Auto Pricing should already help you with the core pieces you need:
- a Min Price and Max Price per SKU
- the ability to Compete with Leadtime
- the ability to Enable Price Increase
- rule-level enable/disable control
- management views across All Products / Auto Pricing / Protection
- overview cards such as Winning Buy Box, Brand Risk Warnings, and Current Usage
- bulk edit plus import/export
- price-change trend visibility
That matters because it means this is much closer to an operating workflow than a one-click price tool.
Why this can directly affect Buy Box performance
On Takealot, Buy Box outcomes are rarely decided by one dramatic price cut. More often, they change because of many small moves that compound over time.
What usually matters is not only:
- how low your price is right now
but also:
- whether you are still inside a sensible competitive range
- whether you are reacting to the right competitors
- whether your fulfillment position gives you room not to overreact
- whether you can move price back up when the market loosens
Manual repricing usually breaks down because no one can do all of that consistently for long. You may spot the price change today, but that does not mean you can keep monitoring it all day, across all important SKUs, without drifting into weak margin decisions.
The two fields that matter more than most sellers think
If I had to pick the two most important controls in this workflow, they would be:
- Min Price
- Max Price
Because these do not just define a number. They define what your pricing rules are allowed to do on your behalf.
Min Price is your line in the sand
Many sellers think of Min Price as a technical requirement. It is not. It is your risk boundary.
Its real job is to stop automation from dragging you into a price war that was never worth fighting in the first place.
If your floor is not clear, Auto Pricing can still automate movement, but it cannot automate judgment.
Max Price is what makes price recovery usable
The other side matters too.
If you want automation to raise price when competitors weaken, but you do not define the upper boundary clearly, your pricing behavior becomes harder to trust and harder to review later.
The stronger setup is:
- use
Min Priceto protect the downside - use
Max Priceto frame the upside - let your competitive logic operate between those two points
That turns pricing from reactive chasing into controlled movement.
How to set Min Price and Max Price for Takealot auto pricing
Most sellers do not need a complicated model at the start. They need a rule set they can explain in one sentence.
| Setting | What it should answer | What happens if it is missing |
|---|---|---|
| Min Price | What is the lowest price I can accept and still protect margin? | Automation may keep following a price war that is not worth winning |
| Max Price | How high can I recover price when pressure drops? | Recovery becomes inconsistent and harder to review |
| Compete with Leadtime | Do slower-shipping sellers really define the price anchor for this SKU? | You may either overreact or ignore a real competitive signal |
| Enable Price Increase | Do I want price to recover after the market loosens? | You stay artificially low even when competition weakens |
Do not treat Leadtime competition as a universal switch
One of the most important choices in the current dialog is:
- Compete with Leadtime
This matters because it changes which offers you are really willing to chase.
If you mainly sell In-stock and your competitors are slower Leadtime sellers, you may not always need to follow them down. In some categories, fulfillment speed still gives you enough room to stay competitive without copying their lower price.
But the opposite can also be true. In more price-sensitive categories, Leadtime sellers can still shape the market anchor, and ignoring them completely may leave you out of the main competitive range.
The practical way to decide is simple:
- watch the SKU for a week or two
- identify which sellers are consistently shaping price expectations
- decide from evidence, not assumption
This is one of those settings that works best when decided product by product.
Many sellers underuse Enable Price Increase
This is where a lot of auto pricing setups become one-directional.
The current Revenuealot flow supports:
- Enable Price Increase
That matters because the goal is not only to react when competitors get cheaper. The goal is also to recover margin when the pressure drops.
If a competitor raises price, runs out of stock, or becomes less aggressive, you should not stay artificially low just because you needed to be competitive yesterday.
A mature Buy Box strategy is not:
- “hold the lowest price as long as possible”
It is:
- “be competitive when needed, recover profit when possible”
Without price increase, Auto Pricing becomes too close to a permanent discount engine. With recovery enabled and bounded properly, it becomes a much more realistic operating tool.
Why Protection belongs in the same conversation
Auto Pricing is not only about price moves. It also gives you:
- Protection
That is important because not every Buy Box loss is really a pricing problem.
Sometimes the actual problem is:
- a new seller enters the listing
- an unusual competitor disturbs the offer stack
- the structure of competition changes and your old rule set stops fitting the listing
That is why the stronger operating model is:
- Auto Pricing handles pricing action
- Protection helps you notice when the market context itself has changed
That combination is much closer to how a real seller actually works day to day.
A practical way to start using it
If you are setting this up for the first time, I would keep it simple.
1. Start with a small group of important SKUs
Do not enable Auto Pricing across the whole catalog on day one.
Start with products that are:
- already selling consistently
- clearly competitive
- easy to cost correctly
- important enough to review every week
Those give you the cleanest signal fastest.
2. Set the four controls that actually shape behavior
For each test SKU, focus first on:
Min PriceMax PriceCompete with LeadtimeEnable Price Increase
At this stage, you are not trying to be aggressive. You are trying to make the workflow predictable.
If you want to put this into practice straight away, go to the Revenuealot Auto Pricing page, choose a small set of priority SKUs, and configure those four settings before expanding the rules across more listings.
2.1 Use this first-pass setup checklist
| Goal | Recommended starting move |
|---|---|
| Protect margin | Set a realistic Min Price before enabling any rule |
| Avoid erratic recovery | Add Max Price from day one |
| Decide whether speed beats price | Test Compete with Leadtime SKU by SKU |
| Avoid permanent discounting | Turn on Enable Price Increase where margin recovery matters |
| Keep testing manageable | Start with a small group of proven SKUs |
3. Watch ranking, not just price movement
Once the rule is active, do not ask only:
- did price change?
Ask instead:
- did ranking improve?
- did Buy Box visibility improve?
- did price move without any meaningful position gain?
That is the difference between activity and actual progress.
4. Use the overview cards as a weekly operating snapshot
You already have a useful weekly operating snapshot in:
- Auto Pricing Enabled
- Winning Buy Box
- Brand Risk Warnings
- Current Usage
That is enough to support a simple weekly review:
- how many live pricing rules you now have
- whether Winning Buy Box is moving in the right direction
- whether risk signals are rising at the same time
- whether current usage is still healthy
5. Use the trend chart to spot instability
The trend view is not there just to look good.
Its main value is helping you spot when automation is making too many movements without producing better outcomes. If price is moving constantly but Buy Box performance is not becoming more stable, your rule set is probably too loose.
Which products are the best candidates
The strongest candidates are usually:
mature SKUs with frequent price pressure
These are the products where manual repricing becomes repetitive and expensive in time.
products with a well-understood margin structure
If you do not know the acceptable floor, you should not automate the competition yet.
core revenue products where Buy Box matters a lot
If a small set of SKUs drives a large share of turnover, those are exactly the products where rules and consistency matter most.
When to hold back for now
I would avoid switching on Auto Pricing too quickly when:
- your margin floor is still unclear
- pricing is constrained by brand or offline channel policy
- you do not yet understand the competitor structure
- the listing itself has unresolved seller or catalog issues
Automation works best when the basics are already under control.
The simplest way to judge whether it is working
Do not judge it on revenue alone.
The cleaner test is whether these improve together:
- ranking
- Winning Buy Box count
- margin health
- time spent manually repricing
If those are all moving in the right direction, then Auto Pricing is doing what it should do.
Final takeaway
If you want Revenuealot Auto Pricing to genuinely improve your Takealot Buy Box win rate, the most important move is not simply turning automation on.
It is:
- setting clear price boundaries
- deciding whether Leadtime competition really matters for that SKU
- enabling price recovery, not only price drops
- watching Protection alongside pricing
- reviewing ranking and trend behavior regularly
Used that way, Auto Pricing stops being just a pricing feature. It becomes a much more realistic Buy Box operating workflow.
If you want to move from theory to action, the best next step is simple: pick a handful of high-value SKUs, open Revenuealot Auto Pricing, and build your first rule set around Min Price, Max Price, Leadtime competition, and price recovery. That will tell you more in one week than another month of manual repricing.
FAQ
Does Auto Pricing always lower my price?
No. A good setup should lower price only when competition justifies it and raise price again when the market gives you room. That is why Enable Price Increase matters as much as your lower boundary.
How should I choose a Min Price?
Start with the lowest price that still protects real margin after platform fees, shipping pressure, refunds, and promotional volatility. If that number is unclear, fix that first before letting any automation compete on your behalf.
Is Max Price really necessary?
Yes. Max Price keeps recovery disciplined and makes later review easier. Without it, your pricing behavior becomes harder to trust and harder to explain.
Should I compete with Leadtime sellers?
Sometimes yes, sometimes no. If your fulfillment advantage is meaningful, following every Leadtime seller down can be unnecessary. Watch each SKU for a week or two and decide from evidence rather than applying one rule across the entire catalog.
Which products should I start with?
Start with SKUs that already sell, face visible price pressure, and have a clear cost structure. Those products usually give you the fastest and cleanest signal.
When is Auto Pricing the wrong first step?
When your real problem is unclear margin, unstable listing quality, unresolved seller issues, or a competitor structure you still do not understand. Automation works best when the basics are already under control.